Thursday, October 4, 2012

Staying Ahead of the Curve: Get Hip to Your Curves, Don’t Skirt the Issue! - Part 4 of 4


Welcome back for the final installment of “Staying Ahead of the Curve”, the quest for creating that coveted hourglass figure. If you missed posts 1, 2 or 3 in the series, please check those out too, lots of great information there as well. Also, some exciting news! We've joined the world of Facebook, so be sure to show your support with a "like" on the "A Stylish Transition" page. 

Today, in part 4, we’ll be discussing how to encourage flattering curves around your hips to wonderfully round out the bottom of that hourglass. As I’ve mentioned many times previously, enhancement (lengthening) of any of the body’s lines can be achieved either by adding volume, or by highlighting/drawing attention to that area. The hip line is no different, and by design, the fashion world offers a myriad of style options to come to our rescue. Let’s jump right in with an example:


Here we have coral, black and white, pleated full/A-line skirt from H&M with a tailored, white button up blouse suspiciously similar to the one in the previous post (ok, you got me, it’s the same one… I told you it was a staple!). This is more of a quintessentially classic, feminine look than I typical wear, however it always fun to stretch one’s limits. Of course, I had to add the pearls for good measure. So what is the lesson to be learned from this ensemble? Lets take a closer look at the skirt and how it creates that sought after volume. Pleats are great for creating volume, really great in fact. For example, this particular skirt has some pretty serious pleat action going on, which takes my hip measurement from its actual 38” to appearing to be around 42” where the outer edge of the skirt appears around my hips. That’s a tremendous increase! Additionally, the skirt is lighter around the hips, further highlighting that section for an added bonus. This is considered a full or an “A” Line skirt , because, quite literally, it is shaped like the letter A (see… some things about style are really straightforward!). The top of the skirt sits up at my natural waist and floats freely outward from there, the result: an effortless hourglass shape around the hips. Be sure you are wearing skirts at the proper height around your waist line to get the most advantage from their shape. This full skirt shape is also commonly found in dress designs and has the same voluminous effect. Dresses with the empire waist cut that we discussed during defining your waist have a similar, but generally more subdued effect of an A-Line, flowing outward from the waist. There are many other shapes you can choose from as well:

                                   Bubble Skirt                                                Tulip Skirt

Experiment with Full, Tulip, Bubble or recently trending peplum style (for the braver fashionistas) skirt types. All do a fabulous job creating that volume around the hips that we are after. Remember, the more rectangular your body shape, the more you want to go for a fully flaring, exaggerated, skirt shape. Styles with only subtle flares do well with the encouragement of slightly curvier bodies but could potentially sit lifelessly and appear shapeless on you. As always, trust your intuition... if it looks fabulous, go for it.

While adding volume to your hips does the trick nicely, there is a surprising other alternative for those of us with straight, more rectangular body shapes. Though it may seem a bit counter intuitive, you can actually do the opposite of what we’ve just discussed and wear something form fitting, like skinny jeans, on the bottom and let your natural curves do all the work for you. This trick is surprisingly effective even with only the most modest of curves if you are of slim build. With a slim build, it doesn’t take much of a difference in hip and waist measurements to see a subtle curve. Let’s take a look at this trick in action:


This outfit features a lush Plum Red, cowl neck, cashmere sweater (brand new and oh so comfy!) and a pair of dark wash, mid-rise skinny jeans from H&M.  This works best with mid to higher waisted jeans and a top that fits a bit more loosely (I find the combination of contrasting looser tops with more form fitting bottoms to be quite effective, rather than form fitting both on the top and bottom). The higher waisted top of the jeans layered under the top helps add a touch more volume as well... every little bit helps. This same concept could work just as well with form fitting pencil skirt if you want a change from skinny jeans.

In review:
  1. Try A-line, full, tulip, bubble or peplum style dresses/skirts to add volume to your hips.
  2. Be sure to wear skirts at the proper height around your waist line to get the most advantage from their shape.
  3. The more rectangular your body shape, the more full/exaggerated you want your skirt shape to be.
  4. If you are slim, trying something form fitting on the bottom and let your natural curves shine... you may be pleasantly surprised. 

Wednesday, September 26, 2012

Staying Ahead of the Curve: An Opportunity too Good to Waist! - Part 3 of 4


As we’ve discussed in parts 1 and 2 of our series on creating curves, enhancing your silhouette with those iconic feminine hourglass curves is a wonderful way to build a flattering foundation for any style. This time we will look at how best to shape our waists to create a graceful inflection point of our hourglass shape. With a rectangular body shape, it is sometimes difficult for the eye to tell where the curve of the waist should fall so its important we offer as much help with our style choices as possible when we’re trying to create those hourglass curves. Being a rectangular body shape, I find that defining my waist is the single most useful way to help achieve a curvier appearance. This is because my bust and hip measurements (if you recall, I’m 37-30-38)  are already about the same, so if I give the appearance of a smaller, more defined waist, my top and bottom (bust and hips) are balanced. Subsequently, bringing in my middle (waist) makes a curvier shape. I can make curves more pronounced by adding more on top and bottom if I like as well.  If creating curves is the goal, we should always focus on a balanced bust and waist, while adding definition to the waist. This can be accomplished by finding clothing that is tailored to flatter the waist or by defining your waist with a belt.

Like we’ve talked about, your natural waist should be a few inches above your navel, however there is some flexibility in where you can actually define this line. Depending on how clothing falls on your body you may want to define it slightly higher or lower depending on what looks best, you’ll know the sweet spot when you find it and it will vary depending on what you wear.

Clothing tailored to shape the waist - 

Luckily, many tops or dresses are already tailored in such a way as to shape the waist rather than simply hanging flat. Let’s take a look at a simple example:


This simple white button up blouse (which should be a staple of any woman’s wardrobe), is a great example of darts (seams used for shaping). Do you see the vertical seams that pull the fabric in below the bust? They create the gently curving silhouette along my side, very flattering. If possible, look for these types of fitted styles and be sure to try them on… they wont work too well if they aren’t following your body shape.

Another way to choose clothing which pulls in at the waist is to look for empire waist cuts. Sorry to all you Star Wars fans out there, but it is actually french and pronounced “om peer”, so you won’t see Darth Vader sporting one of these anytime soon (unless he’s trans and reads my blog). Like the v-neck is the flatter-any-body-type neckline, the empire waist cut is a go to flattering waist cut for most body types. An empire waist is any waistline that is defined just below the bust (above the natural waist). Below this defined waist, the lower portion of garments with empire cuts hang, flowing outward away from the waistline to varying degrees. This cut can be found in both tops and dresses.

 It just so happens that I have a top that is an example of this great v-neck, empire waist combo:


As you can see, the waistline is directly below my bust, while the sides slope gently outwards as they make their way down to my hips. This sloping line reinforces the lower half of that hourglass shape. Many of us may find that we’d like to shed a few pounds, especially around our stomach area (the dreaded beer gut!). By hanging loosely over your mid-section, empire waists can help conceal and de-emphasize those extra pounds. Sometimes fitted clothes like our first example can be not as effective due to a bulge here or there, an empire waist tends avoid this problem.

Defining the waist with belts - 

The idea of using belts outside of safety of the belt loops on your pants may seem a bit awkward at first, but it is a handy trick when it comes to defining the waist line and can become a useful accessory in your wardrobe. A few things to consider with belts are the color, width, and placement on your body.

You have likely seen plenty of clothing with built in belts, ties, or ribbons around the waist. These combinations are very helpful for a few reasons. Not only do you get a free belt, but they will likely give you a nicely coordinated belt/top combination so you won’t have to worry about pairing your own belt (though that can be a fun opportunity for accessorizing in your own style). Let’s take a look at an example of this type of combo:


The thin black belt on this coral top falls right on my natural waist, creating lines that sweep outward from it both above and below, a subtle hint to the eye of that hourglass shape. Notice how when you pull in, even slightly, at the waist, it forces the fabric to then flow outward from that point, instant curves! When shopping for these kinds of tops/dresses, be sure to look critically at where the designed waist of the garment falls in relationship to your natural waist. As a guideline, you typically want to aim to hit your natural waist or slightly above, however, it may still be flattering if the belt falls elsewhere too so use your best judgment, some looks work best slightly below the natural waist too.

Amongst the options to consider when choosing a belt is the width of the belt. Whether a belt is skinny or wide, its important to find one that adjusts either with a buckle or by stretching around your particular waist sizes and can fit both above, on, and below your natural waist. Feel free to play with widths on your own body to see what you like, some general tips to help: With less defined, rectangular waists (like mine) skinny belts which lay slightly lower than your natural waist in front usually look great. Girls with longer torsos/waists can wear wider belts quite successfully; conversely, shorter waisted girls should stick more to thinner belts. Wider, elasticized belts can be used to have a “girdling” effect over areas that may have a little extra.

Layers offer many opportunities for creativity and creating volume, however, curves will tend to get lost a bit in multiple layers. With so much potential for putting our own personal twist on our style, there is no need to sacrifice creating curves while playing with layers. It is simply too much fun to miss. Once again, belts to the rescue!


This outfit features a soft pink, button front cardigan over a chambray button up top with a neutral belt wrapped around all the layers. This could also work wonderfully with the outermost layer being a belted sweater. No matter what you wear, be mindful of how baggy or fitted your outfit is in order to avoid creating unflattering bunching when using a belt, this is especially true with multiple layers.

In review:

1. Look for tailoring that promotes curves. Empire waist cuts work especially well.
2. Try pieces with built-in belts to better define the waist.
3. Add your own belt over layers to help create shape.
4. Experiment with different widths and placements of belts to find the most flattering combination.


Wednesday, September 5, 2012

Staying Ahead of the Curve: Curves or Bust! - Part 2 of 4


In continuation of the series for helping achieve that elusive hourglass shape, let’s talk about emphasizing the bustline. The extent to which a person needs to do this varies from no need at all, to… bring on the va va voom…. it all depends on your body shape. If you have a larger, muscular upper body or are more of an exaggerated inverted triangle, you probably don’t need to try to enhance your bust line since it is naturally larger. Featuring it more prominently won’t do much to help your figure.  Instead, focus on balancing the size up top by working to widen your hip line (We will talk all about that in part 4). On the other hand, if you are like me, straight up and down, then this post is for you!

The foundation of a wonderful looking bust is without a doubt a correctly fitting bra. This can be a challenge, especially if you are developing during transition or even wrestling with finding the right breastform size for your frame. The best way to ensure the right fit is to have it professionally done (if you use forms, be sure to have them included when you measure). If that is something you aren’t comfortable with yet, don’t fret… just be conscious of your fit (I have the same anxiety about it). There are bra size calculators online which you can input your measurements into, however their accuracy may not be great. Many bras have built in padding which obviously will enhance the bust line, this trick shouldn’t be a surprise to anyone… it’s so common because it works! With everything held proudly where it belongs, we can further create the illusion of a fuller bust in a couple ways: by adding volume or by highlighting/attracting interest.

While keeping our strategies for softening shoulders in the back of our mind, we can add fullness to the bust with tops that feature ruffles or other detailing over the bust area. Things like ruffles, ruching, or pockets all literally add volume with additional fabric making the area larger, pretty simple. Let’s take a look at a few examples from my closet:

First, and only because I love you all… let’s look at something relatively unflattering for comparison: this t-shirt adds no help to my bustline, so I appear exactly as my body shape.


See... like I said, unflattering, yuck! Now that we’ve got that out of the way…we’ll start more subtly with this green, cowl neck top:


See how even the extra few folds of this style cowl neck fall right on the bustline? Doesn’t have to be much in order to start having some effect. Also, look at how the little gathering detail on the outside of the sleeves falls right in line with the bustline, a bit of extra fabric goes a long way. Notice a difference in how things appear from the t-shirt? Any curvier?

Let’s take a look at another example:


This top features not only the beaded embellishment across the bust which attracts the eye but also the ruching that follows the contour of the neckline, adding a bit of extra fabric. Attracting interest, adding volume… that’s our goal! Also take a look at how the line of the sleeves flows down to just below the bustline in a contour much like that of the hour glass shape itself. The t-shirt sleeves have a similar taper, but end above the bust, truncating that nice flowing line, so be careful of where the bottom of the sleeve hits. Cuts like this make that hourglass line standout, even if it may not be there. 

Yet another way to add volume is by layering. Fall is almost upon us and there is no better season to play with layers of clothing! Try to create volume by adding a silk scarf that rests nicely on the bust. Be wary of putting too much extra volume on your shoulders and neck. Remember, the purpose is to enhance the bust, not the entire upper body.

One quick and easy look that I love to see is simply adding a scarf to a t-shirt or other non-descript top. Take that t-shirt from the first picture, add a cute scarf….


… and viola! Instant added volume and enhanced bust line. See! Easy as can be! :-)

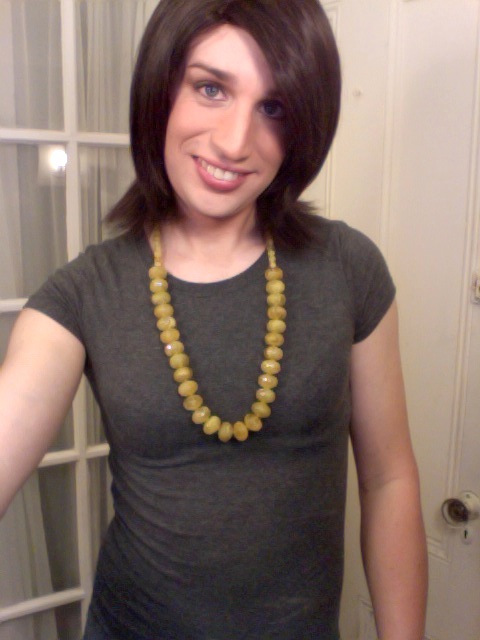
In addition to adding volume, another way to create the effect of a larger bustline is by highlighting and drawing attention to the area. This is generally not too difficult, considering the area usually gets plenty of attention regardless of what you do! One way to accomplish this is through the use of color. Brighter and lighter colors emphasize an area. Try tops or dresses with lighter color blocking or detailing around the bust (or a lighter scarf, like in the previous example).  Another fabulous way to draw the eye to the bust is by using longer, bulkier necklaces that hang over the bust itself… it’ll add some more interest, and perhaps even a little bulk as well. Take a look at that same t-shirt with this yellow beaded necklace:


Perhaps not a huge difference, but it certainly helps promote the idea... if you feel something you try should be working, but isn't... feel free to point at it, that tends to grab attention too ;)

Now that we know a few new ways to flatter our bustlines, I think it’s important to point out that you don’t always (or ever if its your preference) need to enhance the bustline.
Small is quite beautiful, and many times emphasizing another one of your fabulous features negates a need to find that perfect hourglass shape.

To summarize our tips:

  1. To enhance the bustline, add volume and/or attract interest to the area.
  2. Look for dresses/tops which feature ruching, ruffles or other extra fabric to create volume. Look for embellishments and detailing to create interest.
  3. Layering, such as scarves, can be another great way to add volume
  4. Try to draw attention with a longer necklace that rests on the bust.

Stayed tuned for Part 3 of 4, coming soon!

Monday, September 3, 2012

Staying Ahead of the Curve: How to Make a Ruler an Hourglass


I’m sure by now you are all familiar with the infamous body types that divide the female form into categories (Hourglass, Apple, Pear, Rectangle/Ruler, and Inverted Triangle). An “hour-glass” shape is the cornerstone of a feminine image and is our ideal look to create. Nothing exudes femininity quite like  a gently sloping, curvaceous figure.  Most trans-women, especially early in transition, fall into the categories of rectangular/ruler or inverted triangle (this already sounds way more linear than curvy!). For those of you unfamiliar with these shapes, this simply means that we have only very subtle curves through our torso, while our shoulders and upper body tend to be proportionally larger than the rest of our body (a quintessentially male shape). Though it may seem like genetic odds are stacked against us, its worth pointing out that around 46% of genetic women have a rectangular body shape, so we are in good company as we learn to better shape our bodies.

In order to create curves we must consider all of our main bodylines (shoulders/bust, waist, and hips) and most importantly how they relate to each other. If you haven’t already, or just want a refresher, please check out my previous post on The Concept of Line which explains these lines. Shown below with their associated bodylines are the 2 common body types for trans-women side by side with the hourglass for comparison:

Let’s take a look at our ultimate goal, the hourglass shape, and how it’s lines relate to each other; typically a proportionally larger bust line contours down into a skinnier waist line which, in turn, curves gracefully outward around a hip line which is of similar width to the bust line. Now consider your own body shape… for myself, I am much more a rectangle than an inverted triangle, I have modestly broad shoulders, a smaller bust, a regular (but happily existent) waistline of similar width to my bust, and a small hip line (also very close in size to my waist and bust). Overall, I’m a cute ruler at best, prior to any styling magic…. So let the magic begin!

What do we need to do to get from where we are, to that goal of the hourglass shape? We have three options to enhance our curves, and should take full advantage of all three together in order to be most effective:
  1. Create the appearance of a fuller bust.
  2. Define and minimize our waist.
  3. Create the appearance of wider hips. 
Given your body shape, you may not need all three, the key is to make them all work together… bust and hips the same width while being proportionally wider than the waist. For example, an inverted triangle should be careful with techniques for enhancing the bust line because they could emphasize an already large region if not done properly.

A quick caveat: One solution to address these would be to wear padding in the appropriate areas, or other shaping garments (corsets, etc). I find that this has limitations; many times it is both impractical and uncomfortable. If you are inclined to use padding, feel free, it is certainly a viable solution and will lead to good results if done properly. That being said, you can still achieve quite a bit with what you wear, and dressing in a flattering manner is important regardless of padding or not. Let’s look at what we can do with our style to accomplish these objectives.

Since each of these three curve enhancing strategies can be accomplished in a multitude of different ways, I’ve decided to dedicate each one to a separate post, so stay tuned as we go through each one!

Sunday, September 2, 2012

Your Style: Part 1


From the start, I’ve been hoping to make this blog more of an interactive, community experience where we can showcase our own styles, share ideas and be expressive. One of the ways I hope to involve my readers is through readers submitting “Your Style” that we can offer supportive but honest feedback and suggestions. Want to perfect an outfit before a big date, night out, special occasion, or even just what you wear everyday? Send it on in and showcase Your Style!

To get things started with a bang, my brave and always energetic friend Ari has volunteered her modeling talents and fabulous new hairstyle (diggin the color!) for all of us to share. Ari and I have been working to develop the more edgy, rock chic look that she is after, so I’m sure we’ll see her again as we play with new ideas in the future.

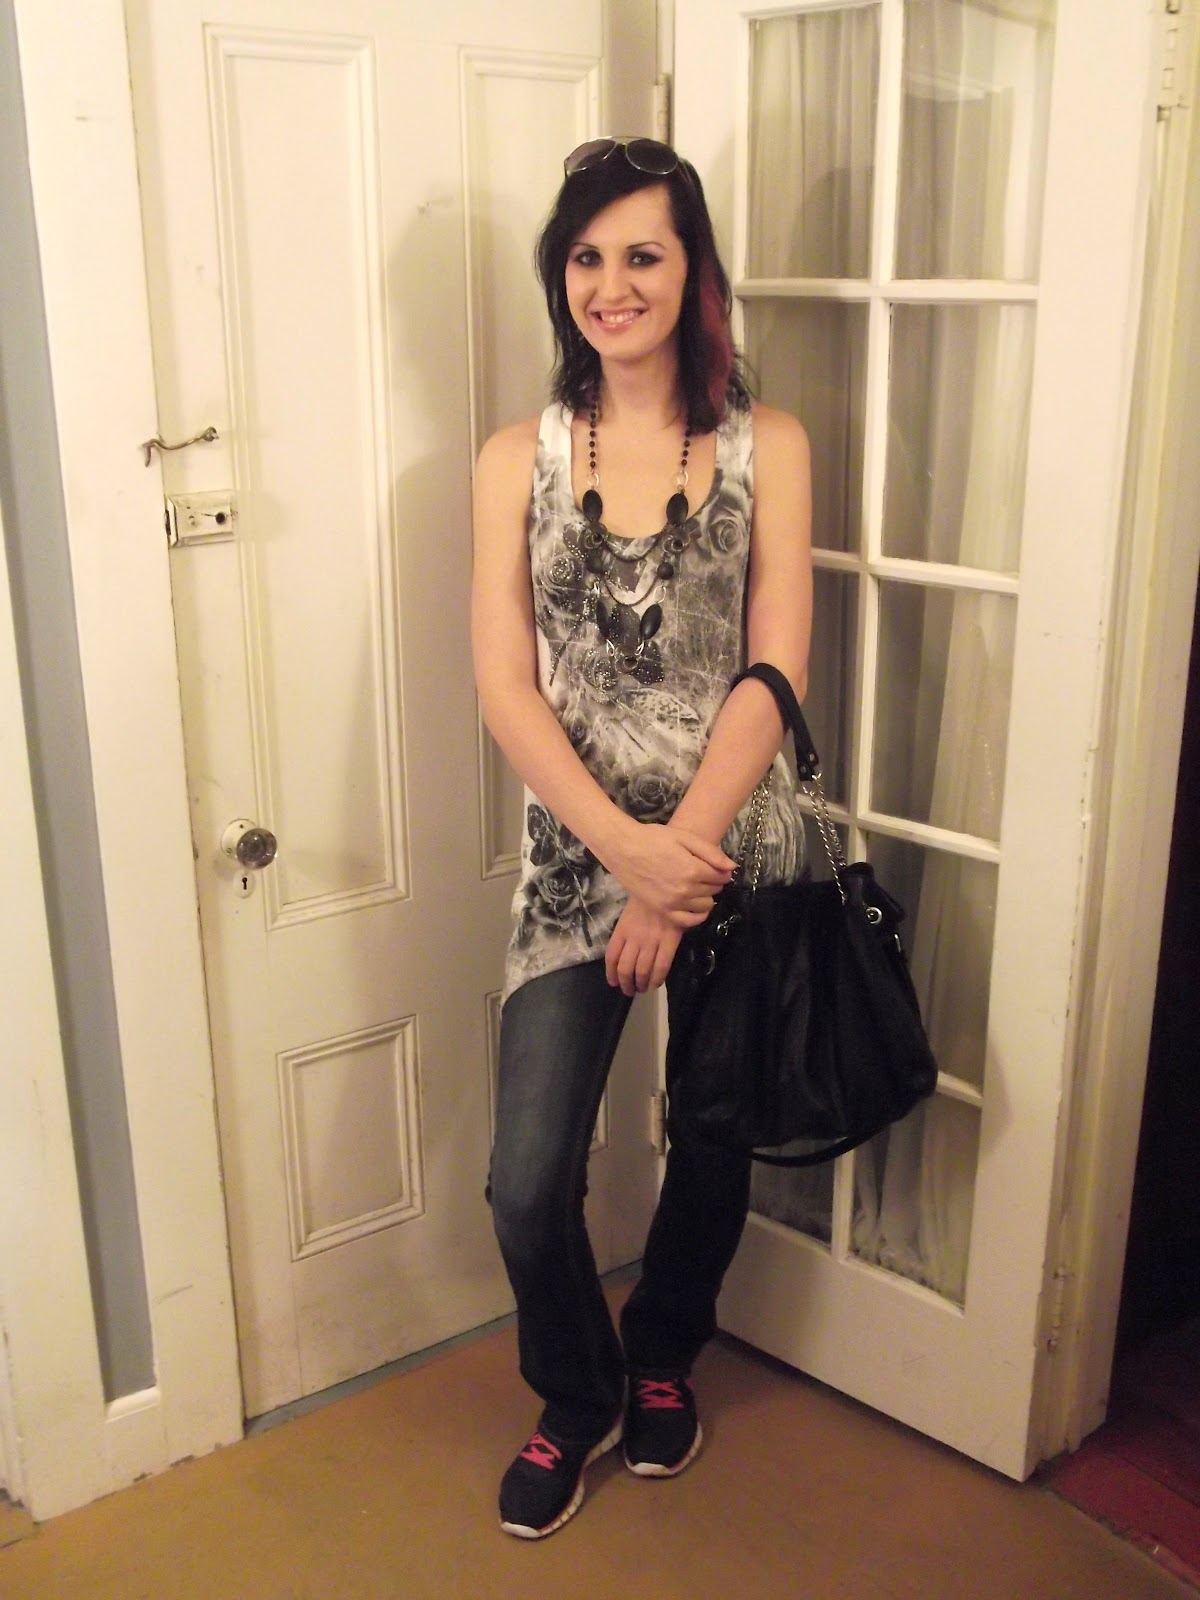
Here is Ari’s ensemble for a casual night out, meeting up with friends for dancing and drinks:


The outfit itself is pretty simple: a tunic length, print, handkerchief hem top worn over jeans with some colorfully laced sneakers.


Overall, a cute monochromatic look, with the focal point being the black and white, rose print top. Edgy, but with a feminine touch, also it is embellished with silver metallic beads around the bust area which you may be able to make out in the photos for even a bit more texture that offers a nice sparkle perfect for a night out.


I love the top, the pattern is feminine, unique, and has a great texture while being an appropriate size for her body (if the roses were twice as big for example, it’d look weird). The wider straps flatter her shoulders nicely while the hem shape adds a bit of a curved contour. Ari has done a good job accessorizing with her bangle bracelet, multi-strand necklace, aviators, and hand bag. All the accessories stick to the same monochromatic color scheme: the silver chain hardware on the bag matches the jewelry for a coordinated look. As always, she’s rocking her gorgeous signature dark smoky eye look, adding a bit more edge. She could easily add a leather jacket or black sweater over this when it starts to get colder outside.

My few suggestions for this outfit focus mainly on creating more curves that will help create a more feminine shape for Ari’s tall and slender figure (we will also talk about creating curves in much more detail in my next post):
-       I would go with a tighter, skinny fit pair of jeans, instead of a regular fit, or since the top is long enough, perhaps to dress it up, a pair of black leggings (maybe some with mesh cutouts or even faux leather for if she were after an even more edgy look). This would make her wonderfully long legs look more slender and offer a needed contrast to the looser fitting top. This contrast would make her hips appear slightly wider.
-        Under the top, she has chosen not to wear a bra and in doing so is missing out on the opportunity to add more curves to her bust line. Every little bit helps!
-       Lastly, I’m not a big fan of the shoes, but I get the idea. Ari’s exact comment on them was “You’ve gotta have a part of the outfit that other people hate… that’s what makes it edgy!” . I’d flip that around and say you should aim to find the part of an outfit that someone will love. I like the idea of a splash of color in a monochromatic outfit; especially with a shoe… this might be more effective with a hot pink (same as the laces) kitten heel or even pump. Though the sneakers may be comfortable, I feel like there is opportunity to take the outfit a bit further with footwear.

Thank you for sharing Your Style with everyone Ari!

If you’d like to share an outfit and are looking for feedback, please send me an email at astylishtransition@gmail.com with 2 or 3 quality photos (at least one full body shot). In your email, please introduce yourself, write down any details you’d like to share about your style, any goals you may have, or specific questions about particular style choices. I will do my best to reply to everyone and will feature people on the blog when I am able. 

Monday, August 27, 2012

Tips for Happy Feet: How to Make Feet Appear Smaller


Christian Louboutin may have put it best, remarking:

 “Shoes transform your body language and attitude. They lift you physically and emotionally.” 

While this is a wonderful thing to say in the business of selling designer footwear, I’m sure we can all attest to how true it really is. Unfortunately, within the trans-community many experience great anxiety over finding shoes that flatter, especially with a shoe size most likely larger than that of the average woman. There is a common emphasis on creating the look of smaller feet, in any way possible.

Women’s shoe sizes typically run 1 to 2 sizes larger than Men’s. For starters, just add to your male shoe size, or even better, just get measured. Though not petite, I’m lucky enough to be a size 10 shoe which puts me at the upper edge of readily available, stylish shoes. To add to the difficulty of minimizing foot size, the selection of shoes larger than a size 10 in most stores is typically very scarce if existent at all (because transitioning needs more challenges, right?). As with any area of style, there are ways we can cope with this, allowing us to go from feeling like clunky scuba flippers to gracefully sleek high heels!

I know what you’re thinking… “This isn’t rocket science Kayci, there is an easy solution to solve this dilemma!” and you are totally correct, brilliant! The easiest way to make your feet appear smaller is to favor wearing shoes with heels over flat-soles. As we talked about in previous posts, heels shorten the horizontal length of your foot and add that length to the line of your leg… the higher the heel, the shorter your foot, it’s like magic! (or trigonometry if you’re of a more mathematical mind).

Problem solved right? …. Not quite, at least not to my satisfaction. I’m a believer that it is impractical to wear exclusively heels, probably a statement much to the chagrin of parts of the trans community. Wearing different types of heels (anything that elevates the foot) such as wedges or others with a wider heel itself will be more comfortable and better options for everyday use since they distribute your weight more evenly. Let’s explore what other options we have and also take a look at ways we can maximize the flattering magic of heels.

Whether wearing heels or not, we want to break up the line of the foot as much as possible to create the appearance of a smaller foot. This works for both width and length.
 Let’s look at the lines of the foot:


As you can see from the pictures, the Length and Width lines have been drawn in. I chose to put the length from the ankle rather than the back of the foot since that is how it is seen from above, however it really doesn’t matter, the idea would be the same. I picked these cute red flats as a good place to start for this example because they are very simple and do not go above and beyond to flatter my foot.

Let’s discuss the Length line first, since that’s what we are primarily worried about. The shape of the toe of a shoe is the first thing we should consider. These flats have a nice rounded toe which does not add any extra length, however many styles of shoes have pointed toes which literally add extra inches to that length line. Not something we want. Other styles include peep or open toe, square toe and almond shaped to name a few (all pretty self explanatory). Try to avoid wearing toe styles that add length to your foot, simple enough.

Next we can consider the vamp and upper section of a shoe. The variety of styles and options is wonderfully diverse here and this is where we can help give the appearance of shortening that length. The goal should always be to break up the line to make it look shorter… this can be done with straps and other shoe details. As a general rule the more skin you expose, the larger your foot will appear (nothing to break that length line!). A simple example of breaking things up is a Mary Jane style, one strap spanning the top of the foot, and essentially cutting that length line in half. Take a look:


Much like the tank top vs the spaghetti strap camisole from the necklines post, be careful with thin, tiny straps. When framed against a large foot, they’ll only contrast it, making things look bigger. Try to find straps on the wider side. 

All the same principles apply to foot width as do to the length. By the same logic, a peep-toe would be better than a sandal style that exposes all of your toes since the “peep-hole” breaks up the width line across your toes. I stick to the general rule, no more than 3 toes showing maximum. Likewise a strap or detail running through the width line will serve to break it up and make your foot appear thinner.

The last thing to consider when choosing the perfect pair of shoes is the color. Darker colors are more flattering than lighter colors, so aim for darker hues and avoid bright, flashy or pastel colors. Don’t feel like you need to limit yourself to only black, just stick to darker shades of your favorite colors.

To summarize these tricks, let’s look at an example of most of these in action:


Note how the length and width lines are broken up for an overall flattering style.

Our important lessons from this post: 
  1. Wear a shoe that elevates your heel
  2. The more skin you expose, the larger your foot will appear.
  3. Avoid toe styles that add extra length
  4. Look for straps and other details that break up the length and width lines
  5. Stick to darker colors
Ready to run out and buy some flattering shoes? Unsure where to go? Try these places:
Online:
Barefoot Tess: Online store carrying only sizes 10-15 
Zappos: Sell all sizes, generally have a wide selection
In stores try:
DSW or Nordstrom Rack, they tend to have good prices and a wide range of sizes.

Saturday, August 25, 2012

Sizing Up Your Style


            While soliciting input from readers I’ve received several requests to do a post regarding finding the right sizes and fits for clothing. Women’s sizing can be difficult to decipher because there really isn’t much, if any, consistency. With variations between brands and body types you end up being a range of sizes, and potentially different sizes on the upper or lower halves of your body too! Not to fear though, we'll make sense of it all :)

Before we start, let’s take a moment and figure out our measurements (if you have a willing friend, measurements turn out better if take by another person):

Bust: measured around the largest section of your bust. If you regularly wear breast forms or heavily padded bras, be sure to wear them while measuring since you will likely be wearing them under your clothes.

Waist: measured around the narrowest part of your waist. This is a bit tricky because a women’s waistline is naturally a couple inches above her navel (take a look back at my post about bodylines and see where the waist line falls). This may not be the narrowest part of your waist, however it will be where the waist portion of clothing hits on your body and that is how the size is determined.

Hips: measured around the widest part of your hips. This should be relatively easy to find. If you use hip padding be sure to include that in the measurement as well. 

For the sake of example, my measurements come out to be 37-30-38 (eerily similar to my high school locker combination). Now that we’re measured let’s figure out our dress size:

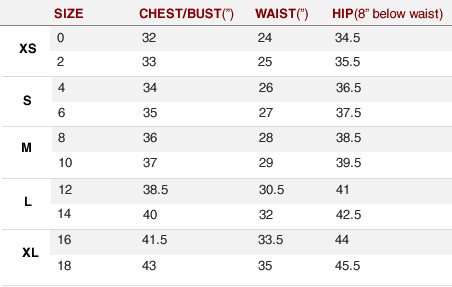
            Dress size is a numbered scale from 0 to 16 (or higher, not sure where it stops). For adult clothing, these sizes are all even numbers; junior’s sizing is all odd numbers. This numbering scheme is used in general not only for sizing dresses, but also tops, skirts, pants and more. Below I’ve included a condensed version of the Amazon.com general women’s sizing chart as an example, and reasonable place to start.


The most important measurement to consider in finding dress size is your bust measurement because that it the area that a dress will fit around primarily. So, ignoring everything else and just using your bust measurement, find the corresponding size on the chart: I have a 37” bust so that makes me a size 10. If you are in between sizes, go with the closest larger size to your measurement. That wasn’t too bad, but lets look at the rest of the chart to make sure we get confused again. 

If you notice… the corresponding waist and hip measurements for a size 10 are 29” and 39.5” while my actual measurements are 30” and 38” … what gives? Size charts are based upon some archetypical female body shape, if you ever find a brand that you match all your measurements exactly to the size chart it is basically like hitting the lottery. Much like winning the lottery, that has never happened to me.
The lesson to be learned from this is that we need to determine which measurements are important depending on what type of clothing we are buying. An obvious example would be buying skirt or pants. You would not want to use your bust measurement to determine pant size! That’d just be silly. Looking at the chart again… my hips are 38” so that would put me between 6 & 8 for pants (I know from experience that I’m typically a 6). Note that I did not use my waist measurement for pants since a women’s waist is above her navel and that is not where I plan on wearing my pants. Probably a point of contention with some, but that has been my experience and has worked well for me. Skirts on the other hand tend to be worn higher and around your waist. Therefore, consider your waist measurement more in determining size.

For dresses and tops you may also see sizes simply listed as Small, Medium, Large and Extra Large with no numbers at all. On the size chart above you see these indicated by XS,S,M,L, and XL on the left for a range of sizes. Small is 4-6, Medium is 8-10, Large is 12-14 etc. It is tougher to ensure a good fit with these ranges and due to subtleties in our body shapes, we may not always come out where we expect. For example, I tend to be a large when it comes to this sort of thing even though a 10 falls into the medium category. I surmise that this is due to the fact that my upper body is “thicker” than a woman who is of similar height and measurements. With experience you will be able to figure out where you fall in the S-M-L scale.

To further add to the already dizzying confusion of sizing schemes, clothing can also be divided into specialty sizes such as misses, juniors, plus, petite, and tall. You have likely seen most of these sections in department stores. These categories are defined by the cut and tailoring of the clothes for different body shapes:

Misses - Cut to accommodate the curves found in the average adult women. Designated by even numbered sizes. 
Juniors - Cut to better fit typical body shapes of younger women (less curves). Designated by odd numbered sizes.
Plus - Cut to fit larger sized women. Designate by a "w" after the size.
Petite - Cut to fit shorter height women (5'3" or shorter). Designated with a "p" after the size.
Tall - Cut to fit taller women (5'9" and above). Designated with a "T" after the size.

Each of these categories will have it's own size charts, so if you feel your body shape falls into one of these categories, you may want to experiment with trying specialty sizes. However, even if you are a specialty size (I'm 5'10" so technically a Tall), you are by no means limited to shop only that sizing... I rarely shop the tall section since I can find clothes that fit well in the normal size schemes.

Being transgender puts a bit more of a twist on easily finding sizes since typically we are less curvy than the average woman. This is notable in our waist and hip measurements. In general, we have larger waists and smaller hips. The trick I’ve adopted to find the best fits is to take my waist, see what size that would be (a 12 on this chart) and take my hip size (an 8) and then split the difference between them, which puts me at a 10 (the size I’d arrive at using my bust measurement).

Each brand will have its own size charts, so check them with each item you buy until you learn your sizes in all your favorite brands. The best way to ensure a good fit is obviously to try something on, especially since size charts are not always readily available in stores, but shopping online (which I find happens more often with the transgender community due to anxieties about shopping in public) means relying on charts exclusively. If you’re uncertain online, order two sizes of the same item, try them on, and return the one that doesn’t fit (be sure to check the return policies first though!).

Summing up the important lessons:
  1. Use sizing charts for each brand you shop, they will be different.
  2. Use the most relevant measurement to determine your size:
    Dresses: Bust, then waist
    Tops: Bust
    Skirts: Waist, then Hips
    Pants/shorts: Hips, maybe waist
  3. Be wary of the S-M-L sizing scheme, learn from experience what fits you best
  4. Try things on, keep track of your sizes, don’t be afraid to try on multiple sizes

Discovering your sizes is a bit of a trial and error process, but with the things we discussed here you should be able to at least start off in the right ballpark. Happy shopping!